With over six years of experience as a performance specialist at Google Canada, I’ve witnessed firsthand how setting up retargeting campaigns can revolutionize businesses, especially in the retail industry. Among the various retargeting techniques available, dynamic remarketing stands out as an effective way to target potential customers who have shown interest in your products but haven’t made a purchase yet.
Here, I’ll be sharing best practices for implementing dynamic remarketing for retail businesses. By following these guidelines, you will have a good foundation to create a dynamic remarketing campaign in Google Ads that reaches your target audience with personalized ads, increases your brand’s visibility, and drives conversions.
What is dynamic remarketing for retail?
Google dynamic remarketing for retail is an advertising technique that allows retailers to show customized product ads to users who have previously interacted with their website or mobile app. Using Google’s powerful advertising platform, retailers can create personalized ads that display products that users have previously viewed or added to their shopping cart.

This technique uses data such as website or mobile app behavior, demographics, and interests to create PPC ads that are highly relevant and tailored to each individual user.
The ads are delivered across Google’s vast network of websites and mobile apps, including Google Search, YouTube, and Gmail, as well as millions of websites and apps that partner with Google.
Benefits of dynamic remarketing for retail
Dynamic remarketing for retail can be a highly effective way to increase conversions and revenue for retailers.
By reminding users of products they have previously shown interest in, it can help to increase brand awareness, customer loyalty, and overall sales.
With its advanced targeting capabilities and real-time bidding system, Google dynamic remarketing for retail is a powerful tool for retailers looking to take their advertising to the next level.
How to set up dynamic remarketing in Google Ads
Use these six simple steps to set up dynamic remarketing for your retail business.
Step 1: Create a Google Ads account
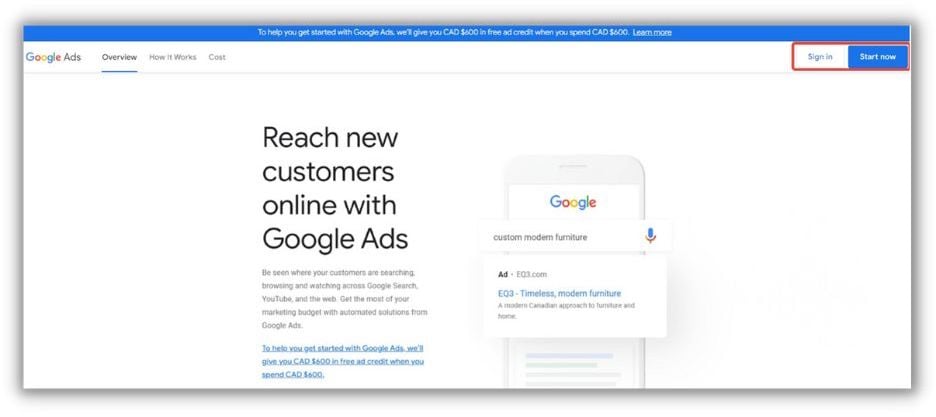
The first step in setting up dynamic remarketing in Google Tag Manager (GTM) is to create a Google Ads account. If you already have a Google Ads account, you can skip this step.
If you don’t, go to the Google Ads homepage and follow the prompts to create a new account. You’ll need to provide some basic information about your business, such as your website URL and your business location.
Step 2: Add your products to the Merchant Center
Setting up dynamic remarketing with Google Ads involves several critical steps, one of which is creating a product feed. A product feed is essentially a spreadsheet that contains all the relevant information about your products, including their prices, images, and descriptions. This data is essential for Google Ads to understand which products customers are viewing and to promote relevant ads for other products.
Thankfully, creating a product feed is a simple and straightforward process. You can use any standard spreadsheet or CSV file to create your product feed, then upload it directly to the Google Merchant Center (create a Merchant Center account here). This process ensures that your product data is accurately and consistently presented to Google Ads, allowing you to create effective dynamic remarketing campaigns that reach the right customers at the right time.
While creating a product feed can seem like a daunting task (especially if you have a lot of products), there are ways to make it easier, particularly for ecommerce websites running on certain platforms. For instance, CMS platforms like Shopify and WordPress (running WooCommerce) have features that can automatically add products to the Google Merchant Center.

An example of where the Shopping Feed can show in Google Ads.
In the case of Shopify, you can use the API method to integrate your Shopify store with the Merchant Center. This method allows you to automatically synchronize your product data between the two platforms, eliminating the need for a traditional feed. This feature can make it easier and more efficient for e-commerce businesses to set up dynamic marketing with Google Ads, as it eliminates the need for manual data entry and ensures that product information is always up-to-date.
With WooCommerce, you can utilize rich results for products with Schema.org structured data (check out Yoast for an easy way to do this). This allows the Merchant Center to automatically crawl your website and retrieve all of your products without the need for a traditional feed. This feature can also make it easier and more efficient for ecommerce businesses to set up dynamic marketing with Google Ads.
Important note: To ensure that Google Ads can use your product feed in dynamic remarketing campaigns, it’s crucial to link your Merchant Center account to your Ads account. This link ensures that Google Ads knows that you have a product feed available to select when creating your dynamic remarketing campaign.
Step 3: Add the Data Layer
To set up dynamic remarketing, one essential step is adding the Data Layer to your website. In the Data Layer, you include information about a specific product that a user viewed on your website, including its ID (which must align with the ID in your Merchant Center feed), its value (the shopping cart and final order value can also be passed), and which page category the user is viewing. This information is then passed on to your remarketing tag, and subsequently to Google Ads.
So how does a Data Layer send this information to Google Ads? Essentially, when a user interacts with your website, an event is triggered. While the complete event snippet code won’t automatically appear in your tracking tools, you can install the Data Layer that pushes relevant data from the products on your website to your Data Layer.
For instance, let’s say a user viewed two products on your website. The event snippet code will contain the value (price) and IDs of the products viewed. The Data Layer can then send this data to Google Ads, allowing you to create effective dynamic remarketing campaigns that target the right customers with the right products.

Event names are an important part of your Data Layer code, as they describe the specific event being measured. In the example provided below, the code is using the “add_to_cart” event to track when a user adds a product to their cart. It’s important to choose the right event name as Google Ads uses it to assign users to automatically generated user lists.

Assuming you have already installed Google Tag Manager (if you do not, please refer to this Google Help Center article), the next step is to implement the Data Layer code customized for your website above the GTM code snippet.
Step 4: Create a Google Ads Remarketing Tag in GTM
To set up a Google Ads Remarketing Tag in your Google Tag Manager account, follow these simple steps:
- Log in to your Google Tag Manager account.
- Click on “Tags” in the left-hand menu, then click on the red “New” button.

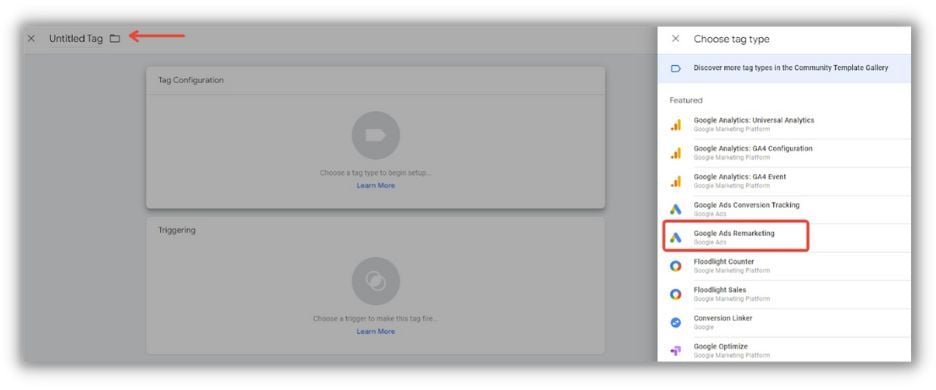
- Name your new tag, then click on the tag configuration section and choose “Google Ads Remarketing” from the list of tag types.

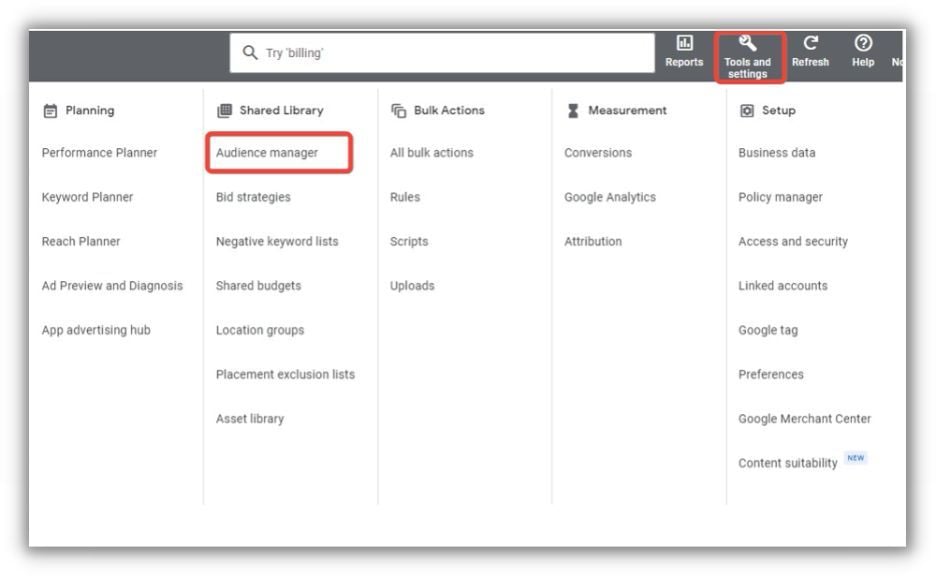
- Enter your Google Ads conversion ID, which you can find in your Google Ads account. In Google Ads, Go to “Tools & Settings” and click on “Audience manager” under Shared Library.

- Select “Your Data Sources” on the left-hand side. From there, click on “Google Ads Tag.” If you do not have a tag set up already, you will be prompted to create one by clicking “Set up Tag.”
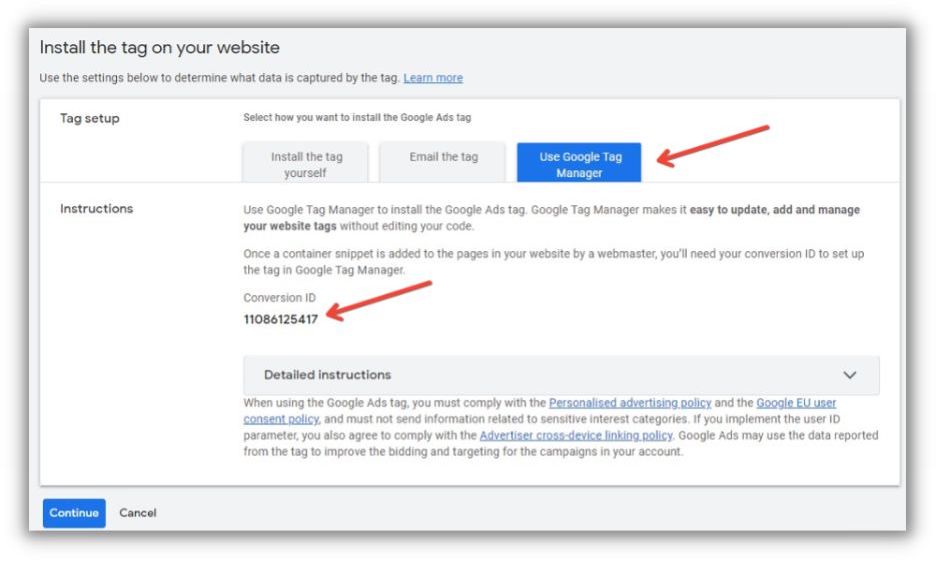
- Once you are on the Google Ads Tag page, scroll to the bottom and click on “Tag setup.” Then, select the option to “Use Google Tag Manager.” This is where you will find the Conversion ID.

- To proceed, simply copy the Conversion ID and paste it into the Conversion ID section of your Google Ads Remarketing Tag in GTM.
- Check the “Send dynamic remarketing event data” option and get ready to take your marketing efforts to the next level!
Step 5: Make your Remarketing Tag dynamic
If you want to leverage custom parameters for your Google Ads Tag’s dynamic remarketing events, there’s one more step you need to take: Making your Remarketing Tag dynamic!
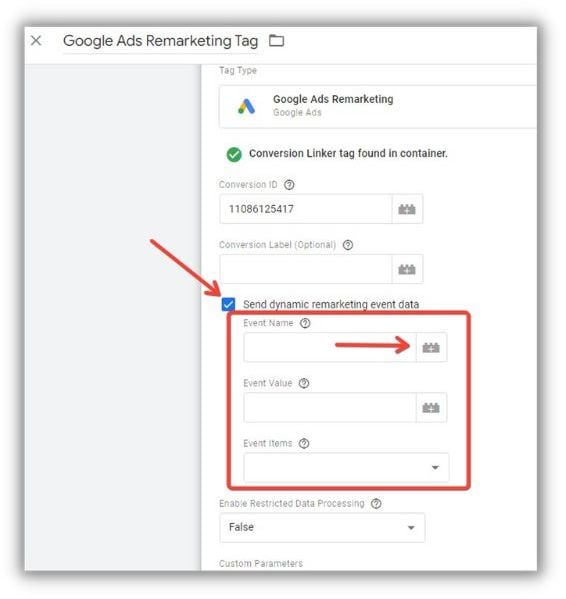
- Choose the predefined variable “Event,” which appears with a gear icon.

- Now it’s time to add the Event Value. Simply click on the “+” icon located next to the text box.

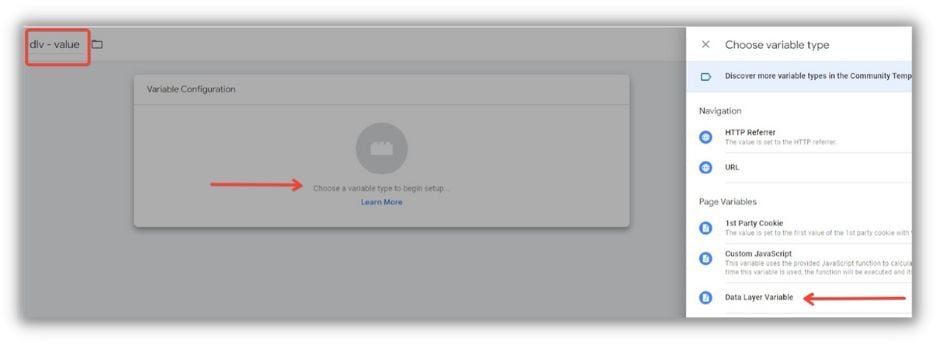
- To continue, click the plus sign located in the top right corner of the screen. Give the variable a name such as “dlv – value” and click on “Choose a variable type to begin setup…” Then, select “Data Layer Variable” from the available options.

- Now, assign the appropriate name from your site’s code to the Data Layer Variable. For example, we used the name “value” in the Data Layer code, so assign that name to the Data Layer Variable.

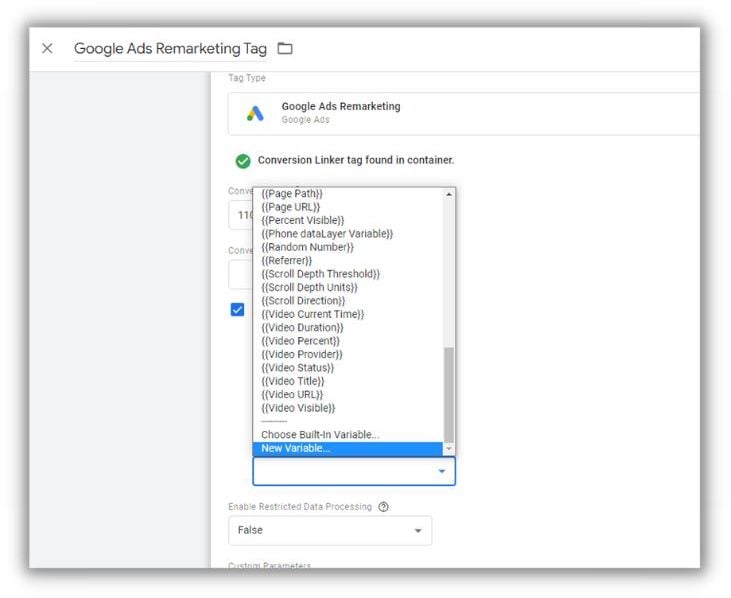
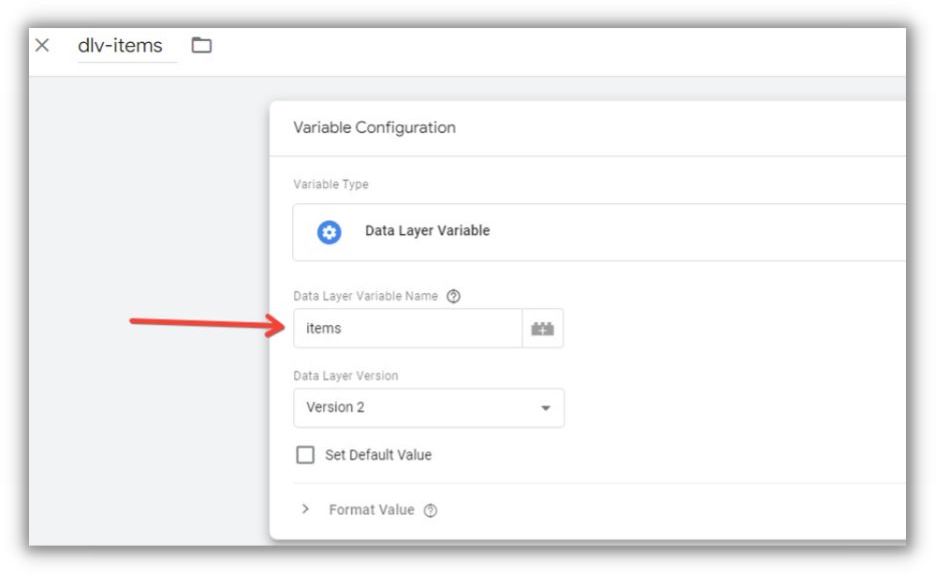
- To complete this step, you will need to fill in the Event Items field. The items array can be found in the Data Layer and retrieved using a Data Layer Variable, just as you did with the value Data Layer Variable. Click on the “Event Items” dropdown menu and look for the option labeled “New Variable” (click this option). Name it “dlv-items” and click on “Choose a variable type to begin setup…” Then, select “Data Layer Variable” from the available options.

- Now, assign the appropriate name from your site’s code to the Data Layer Variable. For example, we used the name “items” in the Data Layer code, so assign that name to the Data Layer Variable.

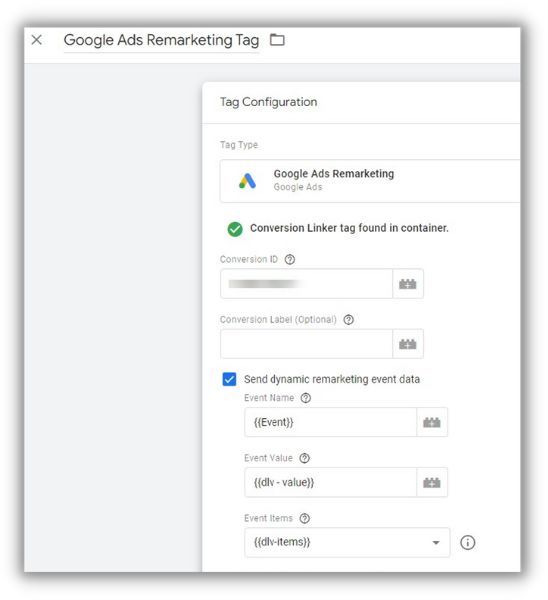
- Your completed remarketing tag with custom event Data Layer Variables should look like this:

Step 6: Create a trigger in GTM for your new dynamic Remarketing Tag
Your goal is to fire the Remarketing Tag when specific events occur, such as a product view, product search, category list view, add to cart, or purchase. To achieve this, we need to create a custom event trigger that will only activate when these predefined events take place.
To start, check the “Use regex matching” option. This is a powerful tool that enables us to use an “or” function with a pipe symbol. You can then copy all of your predefined event names from the Google documentation and separate them with the pipe symbol, like so: view_search_results|view_item_list|view_item|add_to_cart|purchase
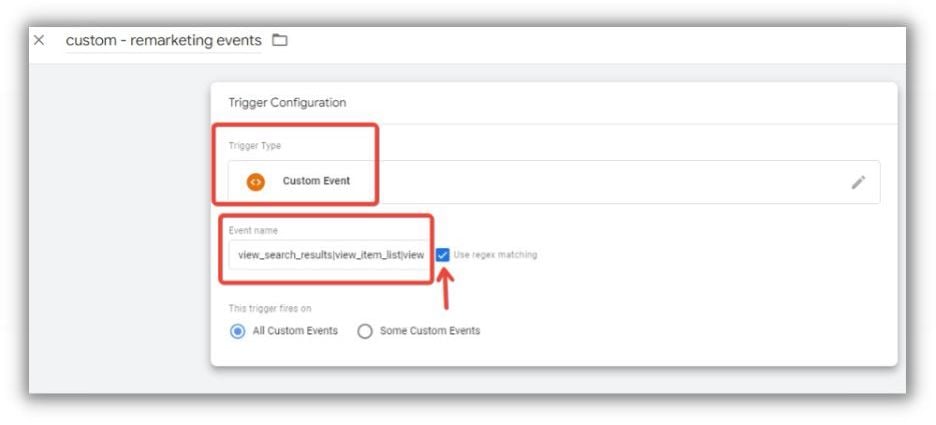
Your Tag will only be triggered when a visitor traverses through these various remarketing events (think of them as steps down the lower half of the marketing funnel). Give the trigger a name and save it.

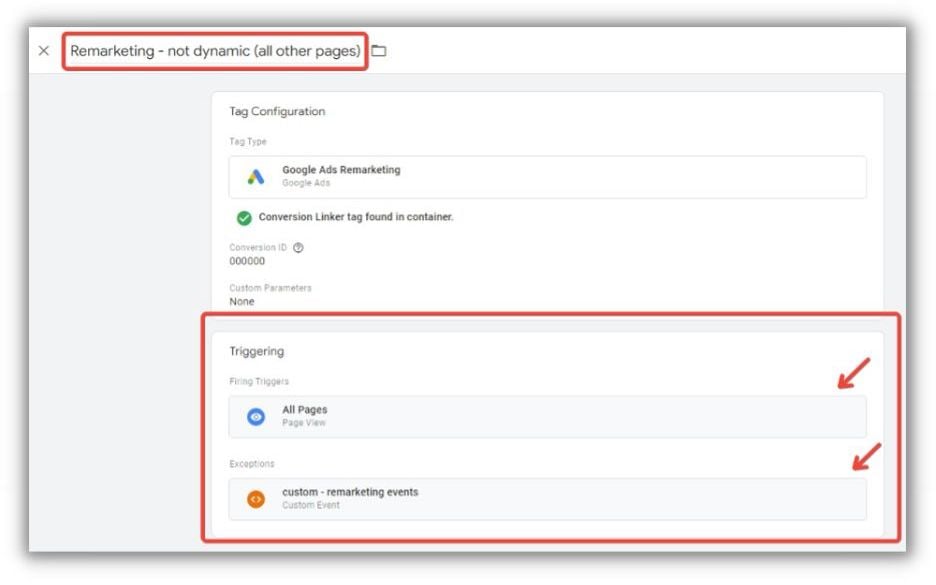
Important Note: To ensure maximum retargeting coverage and flexibility when it comes to creating audiences, it is a good practice to set up a standard Remarketing Tag in addition to the dynamic Remarketing Tag you just created. Begin by creating a new Remarketing Tag in GTM, using the same conversion ID as the dynamic Remarketing Tag. However, do not add any custom Data Layer events to this tag.
Also, make sure to set the trigger to fire on all pages, except for the pages where the new dynamic Remarketing Tag is being triggered. To achieve this, add “custom – remarketing events” as an exception to the trigger.
Get started with dynamic remarketing for retail
To sum up, dynamic remarketing ads are a game-changer for your business when it comes to reaching out to your target audience effectively. By utilizing Google Ads and Google Tag Manager, you can set up personalized ads that are more likely to convert potential customers into loyal ones.
With the best leads being those who have already shown interest in your products, dynamic remarketing is a powerful tool that you can use to target them and increase your revenue. I hope this guide has simplified the implementation process for you and that you’ll use this knowledge to take your online marketing to the next level.
Here are the six steps to set up dynamic remarketing in Google Ads
- Create a Google Ads account
- Add your products to the Merchant Center
- Add the Data Layer
- Create a Google Ads Remarketing Tag in GTM
- Make your Remarketing Tag dynamic
- Create a trigger in GTM for your new dynamic remarketing tag
So what are you waiting for? On to creating your dynamic remarketing ads in Google Ads!







Comments
Please read our Comment Policy before commenting.