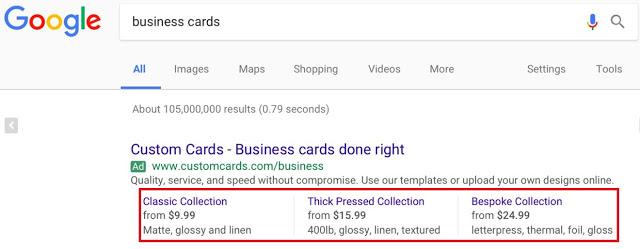
Google Ads price extensions are one of the manually created extensions within the platform. If your ad rank is high enough, these extensions can apply to your text ads on both mobile and desktop devices. Now, the name is pretty self-explanatory. It is a price extension, so we can showcase our price for specific products or services to any user who may see the extension within your ads. One of the benefits of these extensions is they actually work as a combination of a callout and a sitelink extension.
So, in this post, I want to show you how we can set up price extensions within Google Ads on a variety of levels. But most importantly, I want to focus on how we can use these price extensions. I am going to show you a few price extension strategies I have tested out in accounts that have led to successful results. Let’s dive in.
How to set up price extensions in Google Ads
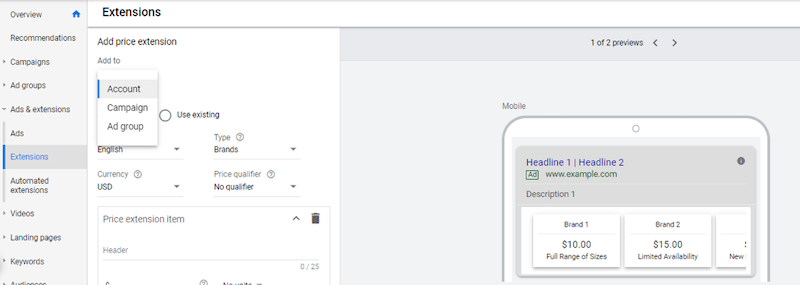
In order to start creating price extensions in Google Ads, we first need to head over to “Ads and Extensions,” and then click on the extensions subcategory. Next, hit the blue plus button and choose price extension. Like most ad extensions, we can add our extensions at the account, campaign, or ad group level.
The way your account is structured will really guide you in how you should set up and implement your price extensions. Let me explain this further. Let’s pretend I have a brand new account, and I just want to get a baseline of ad extensions created just to try to help boost my CTR. By default, if I’m looking to create my price extensions at the account level, I need to look at all of my campaigns I have created in the account. This is because every price extension I create at the account level could show up for any text ad in any of these search campaigns.
When creating price extensions, you have to choose what “Type” of price extension you are going to create. The current options are the following:
- Brands
- Events
- Locations
- Neighborhoods
- Product categories
- Product tiers
- Service categories
- Service tiers
- Services
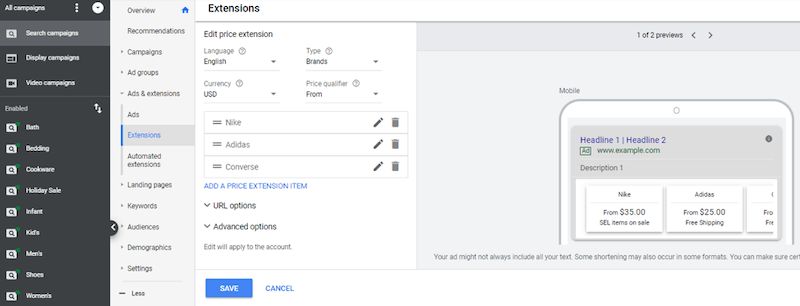
In the image below, I chose to stick with just brands. The rationale behind this decision is because I know the brands in my price extension are the most sought after brands for this particular store. If you’re thinking, “But this doesn’t cover every campaign,” we’ll get there in a minute.
As you can see in the example above, over to the right, we see brand one and brand two. Those are going to be our main headers for the price extension. Depending on your geographical location, you can update the currency, and then you have the option to add a price qualifier. By default, there will be no qualifier, but then you can choose one from your options of “from, up to, or average.”
Next, you need a header for each price extension item you add, and this header can be up to 25 characters long. It is important to mention you cannot have duplicate copy here. Every headline has to be unique otherwise Google Ads will not allow you to save your ad. Then you will need to add a price for every price extension item. After setting the price, you have the option to specify if there is a unit quantity.
Each price extension item also needs to have a description (also 25 characters long) and a final URL. Unlike the headline for your price extension items, the description can be the same for every single item. For example if “Free Shipping” is important to your customers, you can add that value message to every one of your price extension item descriptions. Before you save anything, you need to make sure you have at least three price extension items. The minimum amount allowed is three, but advertisers can add up to eight different items. While adding eight may be appealing, you have to consider how the price extension will look. Let me show you what I mean.
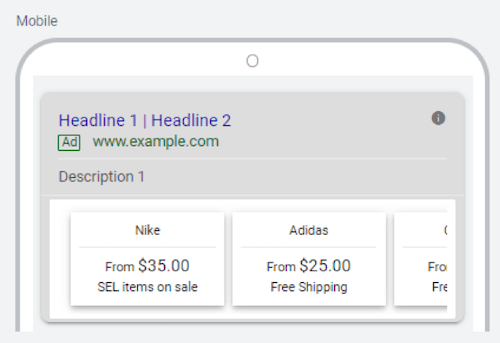
Looking at this mobile preview, not all of your price extension items will show. It’s definitely easier on a mobile device for a user to swipe and scroll through the list, but you will want to make sure that your most visible items are towards the beginning. Advertisers can control the order of the price extension items to better control which items a user will see first.
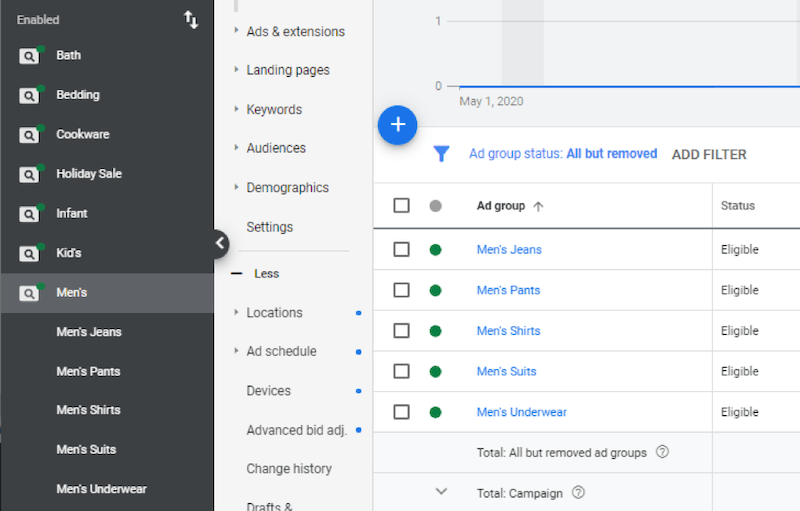
As I mentioned, if I’m going in and reviewing this new price extension I created, I probably will realize that it is not the best option for me to use just one account-level price extension. This is because, if I look at all the campaigns in my account, it may be weird if people are seeing Nike, Adidas, and Converse prices when they were looking up keywords that fall under my bedding or cookware campaigns. This is where you may need to look at going deeper and start creating campaign-level extensions. I can then go on to create a new price extension, choose to add the price extension to a campaign, then I can select my specific campaign so I know this price extension will only show up for this campaign.
Now, we can see a new set of price extensions that will show up just for the cookware campaign. And just as we looked at campaigns when creating the account-level extension, I most likely will want to look at my ad groups when creating my campaign-level price extensions. If we are creating price extensions at the campaign level, I want to make sure this price extension can make sense for any possible search query that could trigger my ads within this campaign.
I came from a corporate retail background, so I’m very familiar with product structure in this industry. We can look at the ad groups in the campaign seen above: Men’s Jeans, Men’s Pants, Men’s Shirts, Men’s Suits, and Men’s Underwear. Each ad group is a completely different type of merchandise we are trying to sell. So it makes sense, as an advertiser, to try and get more specific with my price extensions so I can send users to more specific landing pages.
Possibly one option we may want to test would be to still use a brand type for this price extension. However, since the ad groups are broken out by product categories, we may want to test the product category type. So in the example above I wanted to create a price extension at the ad group level that breaks out my Men’s Shirts ad group into deeper categories for t-shirts, polos, and dress shirts. This is the deepest level we can go when creating price extensions, and my main intent when getting this specific is to help the user find what they are looking for as fast as I can.
When I saved the ad group level price extension, our campaign-level price extension will still be there. But the campaign-level price extension will not show up for this ad group anymore. This is because the ad group-level price extension will override the campaign-level extension. If you want that main categorical campaign extension to show up for this particular ad group, you’re going to have to duplicate that campaign level extension at the ad group level. Hopefully that explains the priority levels of how price extensions work in your Google Ads account.
Test these price extension strategies in your account
Now we know how to set up a price extension, and we know the hierarchy of how they could show to users depending on what level you have set up that price extension within your account. I have seen so many accounts over the years where only one account-level price extension was set up just as a safety net. And even if your safety net price extension at the account level will apply to all of your campaigns, it does not mean we should forget about this extension forever. Of course, our goal with price extensions is to try and drive more goal conversions. But to do that, we need to help users find what they are actually looking for. That being said, there are several ways that we can set up our price extensions to test out different variations and see which layouts actually work the best to help you achieve your account or business goals. In this next section, I want to dive into a few ways that you can test out your price extensions to see if any of these ideas are a better fit for your account.
1. Sort by price
Probably the most common way to set up your price extensions is to test around with price sorting. Here’s just one example already filled out.
But even when you start creating a new price extension, Google’s default example shows you a price extension going from lowest price item to the highest. I have seen this sort of price extension formatting as the most common one. This is of no surprise if you are trying to sell something, whether it is a product or service. There are always going to be people looking for a deal. If your audience is constantly researching the cheapest option, then yes, feel free to try a price-sorted price extension going from the lowest-priced item or service to the highest.
But sorting price extensions from lowest to highest may not be applicable to every single account. Let me show you why.
I have worked with many accounts out there where they do not want to attract the people looking for a deal. So sometimes I have tested out price extensions with clients sorting by the highest-priced product category, and then filtering down to the lowest ones. This is one way that we can pre-qualify users. Again, I do not want someone looking for the free option. I do not want someone looking for the deal. I want the user who has the money, is looking to spend it, and is willing to invest in a higher quality level of service or product.
In the example we see above, we are kind of sticker-shocking them with the enterprise level at $1,000 a year. If they bite at it, great! However, psychologically, most people are likely going to look at what is the next option. We are knocking the price in half on the second one, but in our description, we are saying it is the most popular package. We worded our price extension description that way on purpose. We were not expecting the majority of users who see these options to sign up for that thousand dollar option. This tactic is a way to encourage users to look into the $500/year option and make it seem like it is a better offer or showcase it as the option that is going to best suit their needs. Sorting your price extensions this way could have a few extra benefits. Just like sorting by the lowest first might not be the right option for you, sorting by the highest first might not be the right option for you. You will never know until you test it out and see if it works within your account.
2. Put your most popular products first
Another strategy for testing your price extensions could be sorting by the popularity of the products or product categories. And by popularity, I’m talking about what’s hot right now. What are people looking for? You may have a product or a brand that’s cheaper than everyone else or see more quality than anyone else, but it does not mean that the user actually wants them.
In this example, I just looked up on Google the most popular toy items of 2020. Pretending that I am a toy store owner who sells these products, those would be the options I would select because these items are sorted by the most popular according to the list I found. These are what people are looking for. These are what people are already pre-planning to buy for Christmas so they do not miss out on what’s going to be the hot item, which we are also clearly calling out in our descriptions. We have it in stock. You’re looking for it? We have it. In the second description, we say, “Beat the Holiday Rush.” Encouraging users to buy now to try and push more immediate sales. If you look at the actual price assortments, it’s all over the place. I’m not sorting by lowest to highest or highest to lowest. I’m sorting by what we think people actually want the most, and that’s going to hopefully help drive more traffic and get me more sales.
3. Boost awareness for new products
Another price extension testing strategy could be for awareness building. In this example, we’re using a concert venue scenario. I had to use this as an example because I miss going to shows and hope they’ll be back soon. But before live events were shut down, I saw one venue account use price extensions to promote their new shows.
So, if this account wants to boost awareness for a new show that’s announced, we might make the new show the first extension item a user sees. This is just one example from the event category, but several accounts could try this if they have new products consistently getting released. Maybe you have a new software update that was just released or a new line of clothes from a popular brand. You most likely won’t see the most conversions from these price extensions, but that might not be your goal. Your goal might be to drive awareness.
4. Find out whether to advertise by monthly or annual billing for subscriptions
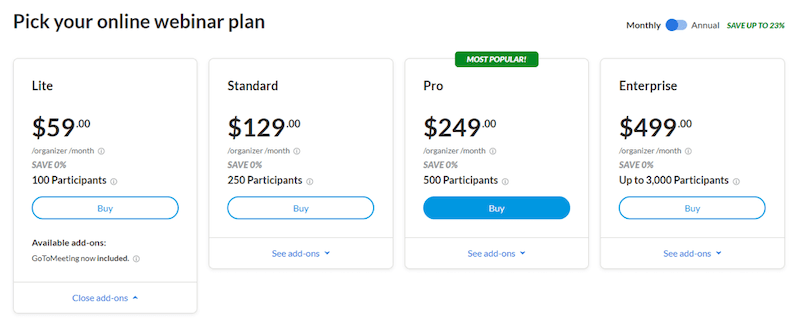
This next option for price extension testing is probably more for subscription accounts, but consider testing your price extensions by monthly or annual billing. To start off, let’s look at the GoToWebinar website.
At the time of this post, when you go to the GoToWebinar landing page, the pricing toggle lets you switch from monthly or annual billing. We can use this pricing option to test two pricing tiers against each other, and you can have those price extensions running at the same time.
In this first example right here, I would want to test out what my price extension looks like if the user sees it billed on a monthly basis. Then, the advertiser can duplicate that exact price extension and just change the units from month to year. Yes, we will also adjust the prices for the annual price extension.
Both of these options are going to be found on the landing page, but then you’ll be able to see which one is actually more enticing to the user. Initially, you might think people might be afraid to be locked in for a year, but you will never know unless you test out these two formats against each other.
5. Promote free products
I had to close out on this one because it is my personal favorite price extension: Google Ads actually lets you enter $0.00 as an acceptable price that you can enter into your price extensions. This strategy is great for promoting free trials.
If you’re looking to at least get people in your pipeline, give away a demo, or you want to at least give them a taste of what your product offers, price extensions can be a great way to do this. I have had a lot of success with former subscription clients using the zero price point to really grow their free trial initiatives. So if there’s anything that you offer for free and you have a dedicated landing page for it, open up your price extension with a zero dollar price point. For any current or former client of mine who has been able to utilize a $0.00 price extension item, this extension was, by far, their best performing one.
Start testing Google Ads price extensions today
Setting up a price extension in Google Ads is very easy, but I strongly feel the most important part we should focus on is testing out the right price extension. Figure out which one is going to have the biggest impact on your account performance or your business goals. You may be focused on more sales. You may want to focus on pre-qualifying the user to make sure that you’re focusing on just the right user interested in your specific products or services. It’s going to be completely different depending on what type of account you have—so start testing!

