If you’re like me, you’re checking Gmail constantly. Despite how much time you spend on Gmail, I bet that good old Google Mail is still holding out a few secrets on you! Well we’re blowing its cover and showing you some of the most valuable Gmail tips and tricks to make your email checking a bit easier.

Gmail Keyboard Shortcuts
Did you know you can use a number of Gmail keyboard shortcuts from within Google Gmail? Some general Word shortcuts apply so that when you’re composing messages, you can use Gmail shortcut keys like:

Ctrl + b | Make your text bold.
Ctrl + i | Make your text italicized.
Ctrl + u | Make your text underlined.
Ctrl + Shift + 7 | Create a numbered list.
Ctrl + Shift + 8 | Create a bulleted list.
Ctrl + k | Insert a hyperlink for highlighted text.
(Note: For Gmail keyboard shortcuts with Mac, simply substitute Ctrl for ⌘)
Check out the full list of Gmail keyboard shortcuts.
More Gmail Shortcut Keys (Just Turn ’em On)
Not handy enough for ya? We’ve got more Gmail shortcut keys, but you need to switch them on manually first. Just hit the gear icon in the upper right corner and select settings. Head to “keyboard shortcuts,” switch them on, then scroll down and hit “Save Changes” at the bottom.
c | Lets you compose a new message. Shift + c composes a message in a new window.
d | Compose a message in a new tab
f | Forward a message
e | Archive a message
# | Delete a message
/ | Do a Gmail email search
Shift + i | Mark as read
Shift + u | Mark as unread
Ctrl + s | Save draft
Gmail Email Search Strings
How awesome is that Gmail search bar? Sure, you can search keywords to filter through your massive collection of emails, but you can do a lot more with it than that.

Take full advantage of the search bar with these tips below. In the Gmail search bar, try typing in:
From: | Search all messages from a specific sender
To: | Search all messages sent to a specific recipient
OR | Search all messages with term A or B. OR must be in all caps.
In:anywhere | Search all messages anywhere in Gmail (including Trash and Spam which are normally excluded).
Is:starred | Search all starred messages
Is:unread | Search all unread messages
Has:Attachment | Search all messages with attachments. This search is great for clearing up space by finding and deleting messages with hefty file attachments.
After: | Search messages sent or received after a specific date
Before: | Search messages sent or received before a specific date. Combine before and after for further precision:
Older_than: / newer_than: | Similar to above, but instead of exact dates you can use days (d), months (m) or years (y).

There are tons more strings you can search using “in:” “is:” and “has:” – see them all.
Best Gmail Hacks: 15 Bonus Gmail Tips
1. Those Dots are Meaningless!
Believe it or not – [email protected] is the same thing as [email protected] OR [email protected] – all these address variations can be used for a single email address. Pretty awesome!
2. The Undo Button
We’ve all wished life had an undo button – for those awkward responses that blurted out of your mouth, for that bus you could have caught if you had ran just a smidge faster, for that stray hand that knocked your coffee all over your keyboard. Well life has just been upgraded – turns out there is an undo button. Well, it’s only for Gmail, but it’s a start.
Activate the “Undo” button by clicking the Gear Icon in the upper right corner, going to Settings, and then heading over to the Labs tab. A few options down you’ll see the ability to enable Gmail’s undo button. There’s a ton of other awesome stuff in GLabs, which we’ll be exploring in some of our other Gmail hacks below.

You can choose your cancellation period – I do 30 secs as a wide safety net
3. Super Stars!
Most of you probably know about Google’s yellow star that you can use to mark important emails. Don’t stop there though – head over to settings and see the 12 different stars and symbols you can use to designate value in your Gmail inbox.

4. Density
Feeling a little claustrophobic in Google Mail? Here’s a nice Gmail secret – change your Gmail’s spacing by hitting that little ol’ gear icon and changing the density. Choose what feels right for you!
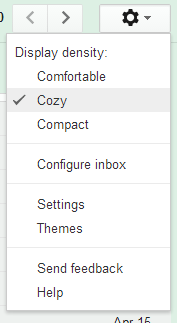
Cozy as a cuddle by the fire in a log cabin. And it’s snowing.
5. Canned Responses
When you’re sending out the same e-mail a bunch of times, make it easy on yourself with canned responses. First, turn on the Canned Responses feature in Gmail Labs. Now just write your email and click the extra drop down bit on the bottom of your message, beside the trash can. Go to Canned Responses and click New Canned Response to name and save your canned response.
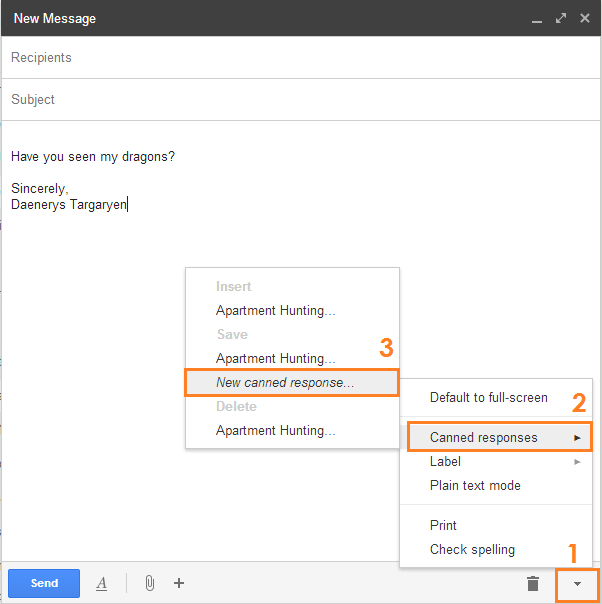
Now, next time you go to compose a new email, go to canned responses and you’ll see the option to insert your saved canned response.
As you can see, I already have a canned response for apartment hunting, as I end up sending the same response (blurb about myself, what I’m looking for in an apartment, when I am available to stop by and see it) multiple times. Once a canned response in inserted, any personalization needed can be added to the template before sending it off.
The ability to create canned responses is a very cool Gmail secret that you probably won’t use most days, but when you do need it, you’ll be glad it’s there.
6. Desktop Notifications
Gmail desktop notifications let you instantly know when you’ve received a new email via a pop-up. This sweet little feature is compatible with Chrome, Firefox, and Safari, and can be activated under Settings > General.
7. Mute Conversations
Tired of watching your co-workers jabber on about things that don’t apply to you? Not a problem with Google Gmail’s ability to mute conversations.
With your conversation open, just go to More, and select Mute. Now that conversation won’t pop back up to your attention unless a new message is addressed just to you, or if you’re added to the To: or CC: fields.
8. Archiving Emails
Archiving emails is a great way to keep your Inbox clean without deleting emails, letting you appear a normal, healthy internet user while secretly hoarding a decade collection of old emails. It’s the perfect tool for online spring cleaning!
For example, my Gmail “social” tab is pretty flooded – it’s mostly messages about Meetup groups I’m a part of, or upcoming events. I don’t want to unsubscribe to these emails because there’s a chance that someday I really will go to the Wednesday African Drum Circle at the MFA. However, I’m getting waaay too many emails from these sorts of things. Here’s what I can do for a quick Gmail inbox clean up.
I’m going to use our search string from earlier to select all emails in my Social tab that are older than 6 days.
BONUS TIP: Clicking the Select All box (the one highlighted in pink below) only selects all the emails shown on that page. To select all emails that match your search, click the link that appears in the pop up (highlighted in blue).

Now that I have all the emails that match my search string selected, I can just hit the Archive button. Goodbye old emails! Ah, that feels better already.

9. Send + Archive: Goodbye Email Clutter
Send + Archive is the next step in super archiving power, letting you send an email and immediately archive it. This features needs to be turned on in the Settings menu before you can start using it.
Now when you reply to an email, you’ll see the option to Send + Archive.
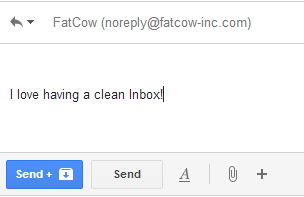
This means that the email will be archived away, out of your Inbox. You can rest easy knowing that if someone replies to your archived email, it will reappear in your Inbox, delivered to your attention.
10. How to Find Archived Emails
The easiest way to find emails once you’ve archived them is to use the search string All Mail: . You can also use the search drop down.

11. Gmail Offline
Did you know that you can read and reply to emails, even when offline? The Gmail Offline Chrome app syncs messages and queues actions you’ve taken offline to implement later, when internet access is available. Now you can be productive anywhere!
12. Gmail Email Tasks
Say goodbye to scribbled to-do lists on Post It notes. Gmail has its own built-in task list! Just open or select and email, click More, and hit Add to Tasks.

You’ll see your custom Gmail task list appear; from there you can add more tasks, add due dates, check off completed tasks, and more.
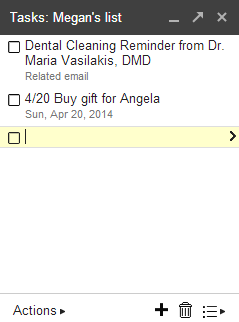
Start a task item with a date and the task will automatically be added to your Google Calendar (provided that you turn on the “task” calendar in the My Calendars section of Google Calendar. Gmail tasks is a great way to stay on top of daily to-dos.
13. Creating Custom Gmail Filters
Gmail filters can do a ton of email heavy lifting for you, if you’ll let them. Start by creating a filter from an existing message. I’ve been doing some apartment hunting lately, and have been sending out a lot of emails through Craigslist. Keeping all those messages organized is important to me, so I’ll make a filter for them.
First we’ll select an email to base my filter off of. Then we can head over to More > Filter messages like these.
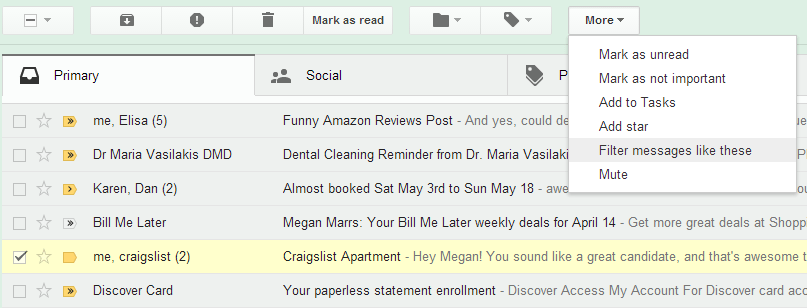
Now it’s time to add the parameters of my filter. I’m going to keep this one simple – I’m going to create a filter for any emails that have the words “apartment” and “craigslist” in the subject line, since that’s the subject line I’ve been using for my apartment hunting emails.

Now it’s time to decide what action the filter will take. I’m going to have this filter add the label “Apartment Hunting” and star the email. And now we’re in business!

(Note: to edit existing Filters, go to Settings > Filters tab)
Another great and easy way to set up filters is with custom email aliases. You can add any +word to your user name and still have those messages delivered to your regular address.
For example, when I sign up for H&M offers, I can use the email address [email protected], but all the messages will still be delivered to [email protected]. Why is this helpful? Now when I create a custom filter, I can create an action for all messages from the address alias. For example, I might create a filter that adds a Fashion label to all messages addressed to [email protected]. And that’s how to make a Gmail filter. It’s pretty easy to do and can make a HUGE difference when it comes to keeping your email organized.
14. See Messages Meant JUST For You
Personal level indicators are arrows next to your messages that show whether an email was sent directly to you (>>) or you and other recipients (>). It’s a nifty little Gmail trick you can activate in the Settings section (scroll about half way down the General tab).

15. Gmail Labels
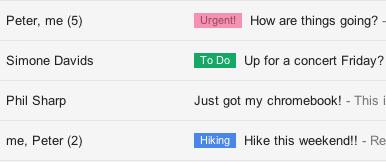
Labels make it easy to keep your Gmail so fresh and so clean (clean, clean). Individual emails can have multiple labels – customize them with bright colors to keep track of what’s what.
People are often confused about how to add folders to Gmail, but Gmail doesn’t technically have folders. Instead, it has labels. Gmail labels can mark emails that live in your Inbox, and can also be used as folders. To move an email into a label folder, select or open an email and choose the Move To option to move the email into the label.
Extra Gmail Add-On Features
There are a lot of great applications that enable you to do some pretty remarkable stuff with Gmail. A few favorites include:
- Boomerang: Boomerang for Gmail lets you write and schedule emails to be sent at a later time or date. Boomerang can also set up email follow-up reminders for you, all built to be seamlessly compatible with Gmail.
- Rapportive: Rapportive is a great tool to help you instantly see all your contacts data right from within Gmail! You can see a user’s LinkedIn account, Twitter info, Facebook, Skype, and more!
Those are our best Gmail tips and tricks. (Also, check out our best tips for running Gmail ads.) May you make the most of your fabulous Gmail email!




Comments
Please read our Comment Policy before commenting.