5 Essential Google Ads Scripts for Better-Optimized Accounts
Google Ads scripts are super helpful for automating tasks and processes within your Google Ads account. But finding and implementing the right scripts for your account may seem like a technical and tedious process. So we’re listing five very helpful, ready-to-use Google Ads scripts and sharing how to implement them–no development experience required!
Contents
What are Google Ads scripts?
Google Ads scripts are snippets of JavaScript code that automate various tasks and processes within your Google Ads account.
They can help optimize your campaigns, manage ads more effectively, and adapt quickly to changes without manual intervention. Integrating these scripts into your strategy can enhance campaign management, save time, and drive better results.
🛑 Want to make sure your Google Ads are optimized for the best results? Find out with a free, instant audit >> Google Ads Performance Grader
5 Google Ads scripts to try (+how to implement them)
Let’s dive in!
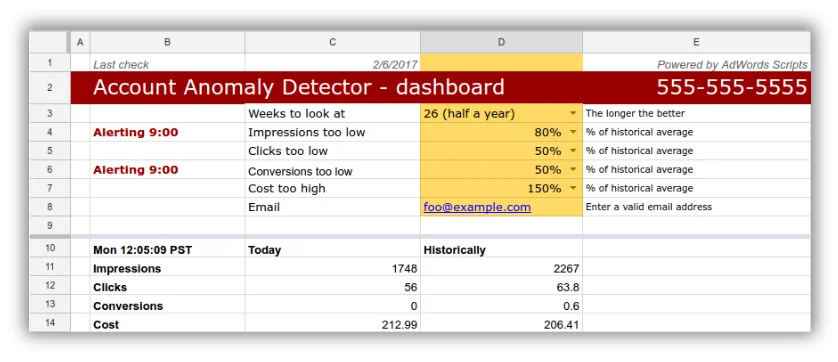
1. Account Anomaly Detector Script
This script monitors your account for unusual fluctuations in key metrics such as clicks, impressions, conversions, and spend.
Benefits include:
- Early detection of potential issues like technical errors or sudden drops in traffic.
- Proactive troubleshooting to mitigate performance impacts.
Here’s how to implement it:
1. Access the Google Ads scripts interface
- Log in to your Google Ads account:
- Open your web browser and navigate to Google Ads.
- Enter your Google Ads credentials (email and password) to log in.
- Navigate to the Scripts section:
- Once logged in, click on the “Tools & Settings” icon (a wrench or spanner) located in the top right corner of the screen.
- In the dropdown menu, find the “Bulk Actions” section.
- Click on “Scripts” to access the Google Ads Scripts interface.
2. Create a new script
- Initiate a new script:
- In the Scripts interface, click on the “+” button (usually a blue plus sign) to create a new script.
- Copy and paste the Account Anomaly Detector script:
- Open a new tab or window in your browser and navigate to the source of the Account Anomaly Detector script. You can find the script on the Google Ads Scripts documentation.
- Select and copy the entire script code.
- Return to the Google Ads Scripts editor and paste the copied script code into the editor window.
3. Authorize the script
- Grant script access to your account:
-
- In the script editor, locate the “Authorize” button (usually found at the top of the editor window).
- Click “Authorize” to start the authorization process.
- Follow the on-screen prompts, which typically involve selecting the Google account associated with your Google Ads account and granting the necessary permissions for the script to access your data.
4. Configure script settings
- Adjust anomaly thresholds:
- Review the script code to locate the section where thresholds for anomalies are defined. These thresholds determine what constitutes an “anomaly” in your account performance.
- Modify these thresholds based on your specific needs and performance expectations. For example, you might set thresholds for click-through rate (CTR), conversion rate, cost per conversion, etc.
- Set up email notifications:
- Find the section of the script where email notifications are configured.
- Enter the email address(es) where you want to receive notifications when anomalies are detected.
- Ensure the email settings (e.g., subject line, message content) are tailored to your preferences.
5. Schedule the script
- Preview the script:
- Before running the script, click the “Preview” button to execute a test run.
- Review the preview results to ensure the script functions correctly and identifies anomalies as expected.
- Save and schedule the script:
- If the preview results are satisfactory, click the “Save” button to save your script.
- To run the script immediately, click the “Run” button.
- To schedule the script to run at regular intervals, set up a schedule by clicking on the “Schedule” button (usually found next to “Run”).
- Choose the frequency (e.g., daily, weekly) and specific times for the script to run automatically.
⚡️ Is your Google Ads account set up for success? Download now >> The Last Guide to Google Ads Account Structure You’ll Ever Need
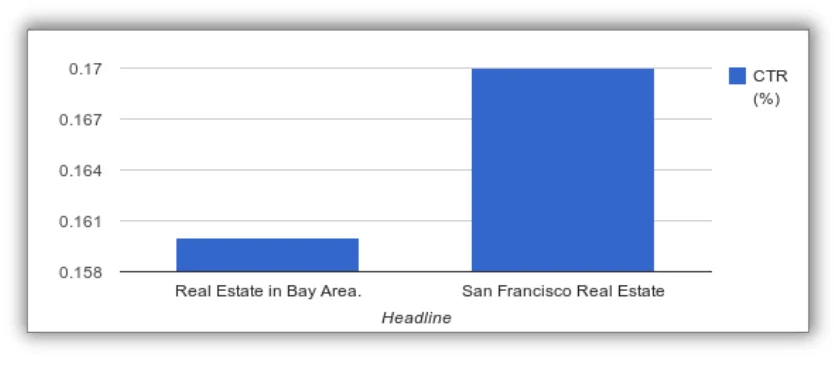
2. Ad Performance Report Script
The Ad Performance Report script analyzes the performance of your ads and provides insights for optimization.
Here are some of the benefits of using the Ad Performance Report script:
- Identifies top-performing and underperforming ads.
- Automates ad pausing or adjustments based on predefined rules.
- Saves time on manual analysis.
Here’s how to use it:
1. Navigate to the Google Ads scripts interface
- Log in to your Google Ads account:
- Open your web browser and go to Google Ads.
- Enter your Google Ads credentials (email and password) to log in.
- Access the Scripts section:
- After logging in, click on the “Tools & Settings” icon (a wrench or spanner) in the top right corner of the screen.
- In the dropdown menu, locate the “Bulk Actions” section.
- Click on “Scripts” to open the Google Ads Scripts interface.
2. Create and authorize a new script
- Initiate a new script:
- In the Scripts interface, click the “+” button (usually a blue plus sign) to create a new script.
- Paste the Ad Performance script:
- Open a new tab or window in your browser and navigate to the source of the Ad Performance script. You can find the script on the Google Ads Scripts documentation.
- Select and copy the entire script code.
- Return to the Google Ads Scripts editor and paste the copied script code into the editor window.
- Authorize the script:
- In the script editor, find the “Authorize” button (usually at the top of the editor window).
- Click “Authorize” to begin the authorization process.
- Follow the prompts to grant the necessary permissions for the script to access your Google Ads account data.
3. Customize performance parameters
- Define criteria for top-performing and underperforming ads:
- Review the script code to locate the section where performance parameters are defined.
- Customize the criteria for identifying top-performing and underperforming ads based on metrics such as CTR, conversion rate, cost per conversion, etc.
- For example, you might set a threshold for CTR above which ads are considered top-performing and below which ads are considered underperforming.
- Set actions for the script to take:
- Define the actions the script should take when it identifies top-performing or underperforming ads.
- Common actions include pausing underperforming ads, increasing bids for top-performing ads, or adjusting other bid strategies.
- Ensure these actions align with your advertising goals and strategies.
4. Test and schedule the script
- Run a preview to check for errors:
- Before running the script, click the “Preview” button to execute a test run.
- Review the preview results to ensure the script functions correctly and performs the desired actions without errors.
- Schedule the script for continuous optimization:
- If the preview results are satisfactory, click the “Save” button to save your script.
- To run the script immediately, click the “Run” button.
- To schedule the script to run automatically at regular intervals, click the “Schedule” button (usually found next to “Run”).
- Choose the frequency (e.g., daily, weekly) and specific times for the script to run, ensuring continuous optimization of your ad performance.
🚨 Want to see how your Google Ads results stack up to the competition? Download our latest Google Ads Benchmarks to find out!
3. Bid by Weather Script
This script adjusts bids based on real-time weather conditions in specific locations.

Benefits include:
- Maximizes ad visibility during opportune weather conditions.
- Tailors bids to match consumer behavior influenced by the weather.
Here’s how to implement it:
- Set up a weather API account:
- Sign up for a weather data provider (e.g., OpenWeatherMap).
- If you need to sign up, go here: OpenWeatherMap Sign Up.
- Generate an API Key:
- Go to the API keys section on OpenWeatherMap.
- Generate a new key.
- Copy the API key to use in the script.
- Access the Google Ads Scripts Interface:
- Log in to your Google Ads account.
- Navigate to Bulk Actions.
- Select Scripts.
- Click on New script.
- Use the Bid by Weather Script:
- Use the Bid by Weather script provided by Google: Bid by Weather Script.
- Copy the script code.
- Authorize the script:
- Paste the copied script code into the new script in Google Ads.
- Authorize the script to access your Google Ads account and the weather API.
- Make a Copy of the Google Sheet:
- Make a copy of this sheet: Google Sheet Template.
- Copy the new URL of your Google Sheet and paste it into the script where indicated (sheet URL).
- Update Geo Targets:
- In the script, update the geographic targets according to your campaign needs. You can refer to the Geo Targeting Sheet for accurate geographic codes.
- Ensure the API Key is Active:
- Make sure the weather API key is correctly entered and active in the script.
- Configure Weather Parameters:
- Enter your weather API key into the script.
- Define the weather conditions and corresponding bid adjustments as per your campaign strategy.
- Test the Script:
- Run a preview of the script to ensure it functions correctly.
- Schedule the Script:
- Schedule the script to run at regular intervals to enable real-time bid adjustments based on weather conditions.
4. Change History Script
The Change History script tracks changes made to your Google Ads account, such as campaign settings, bids, and keywords.

Benefits include:
- Helps you understand the impact of changes on performance.
- Provides an audit trail for troubleshooting or analyzing performance trends.
Here’s how to run it:
1. Access the Google Ads scripts interface
- Log in to your Google Ads account:
- Open your web browser and go to Google Ads.
- Enter your Google Ads credentials (email and password) to log in.
- Navigate to the Scripts section:
- Once logged in, click on the “Tools & Settings” icon (a wrench or spanner) located in the top right corner of the screen.
- In the dropdown menu, find the “Bulk Actions” section.
- Click on “Scripts” to access the Google Ads Scripts interface.
2. Create and authorize a new script
- Initiate a new script:
- In the Scripts interface, click the “+” button (usually a blue plus sign) to create a new script.
- Paste the Change History script:
- Open a new tab or window in your browser and navigate to Nils Rooijmans’ blog to find the Change History script. You can access the script directly from Nils Rooijmans’ blog.
- Select and copy the entire script code from the blog.
- Return to the Google Ads Scripts editor and paste the copied script code into the editor window.
- Authorize the script:
- In the script editor, find the “Authorize” button (usually at the top of the editor window).
- Click “Authorize” to start the authorization process.
- Follow the on-screen prompts to grant the necessary permissions for the script to access your Google Ads account data.
3. Configure change tracking settings
- Define which changes to track:
- Review the script code to locate the section where you can specify which changes to track.
- Customize the settings to track specific types of changes, such as bid adjustments, keyword changes, ad copy changes, etc.
- Modify the script according to your needs to ensure it monitors the changes most relevant to your campaign management.
- Set up email notifications for change alerts:
- Locate the section of the script where email notifications are configured.
- Enter the email address(es) where you want to receive notifications about detected changes.
- Customize the email settings (e.g., subject line, message content) to fit your preferences for change alerts.
4. Test and schedule the script
- Run a preview to ensure accurate change tracking:
- Before running the script, click the “Preview” button to execute a test run.
- Review the preview results to ensure the script captures changes accurately and functions as expected.
- Schedule the script to run regularly:
- If the preview results are satisfactory, click the “Save” button to save your script.
- To run the script immediately, click the “Run” button.
- To schedule the script to run automatically at regular intervals, click the “Schedule” button (usually found next to “Run”).
- Choose the frequency (e.g., daily, weekly) and specific times for the script to run, ensuring continuous monitoring of account changes.
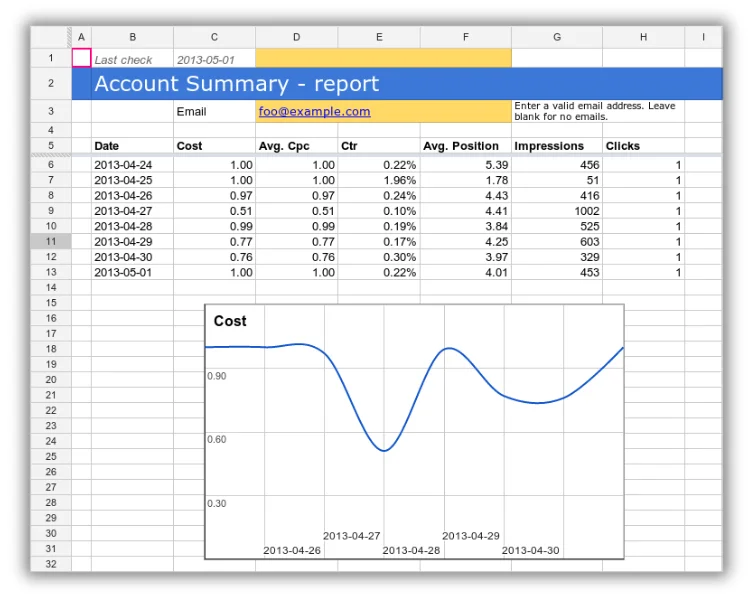
5. Account Summary Script
This script creates a consolidated report of your account’s key metrics.
Benefits include:
- Simplifies performance monitoring and reporting.
- Saves time by automating report generation.
- Customizes reports to focus on the most important data for your business.
Here’s how to use it:
1. Access the Google Ads scripts interface
- Log in to your Google Ads account:
- Open your web browser and navigate to Google Ads.
- Enter your Google Ads credentials (email and password) to log in.
- Navigate to the Scripts section:
- Once logged in, click on the “Tools & Settings” icon (a wrench or spanner) located in the top right corner of the screen.
- In the dropdown menu, find the “Bulk Actions” section.
- Click on “Scripts” to access the Google Ads Scripts interface.
2. Create and authorize a new script
- Initiate a new script:
- In the Scripts interface, click the “+” button (usually a blue plus sign) to create a new script.
- Paste the Account Summary script:
- Open a new tab or window in your browser and navigate to the source of the Account Summary script. You can find the script on the Google Ads Scripts documentation.
- Select and copy the entire script code.
- Return to the Google Ads Scripts editor and paste the copied script code into the editor window.
- Authorize the script:
- In the script editor, find the “Authorize” button (usually at the top of the editor window).
- Click “Authorize” to start the authorization process.
- Follow the on-screen prompts to grant the necessary permissions for the script to access your Google Ads account data.
3. Customize the report settings
- Define the metrics to include in the report:
- Review the script code to locate the section where metrics are defined.
- Customize this section to include the specific metrics you want to track in the report, such as impressions, clicks, conversions, cost per conversion, etc.
- Set the frequency of report generation:
- Find the section of the script where the reporting frequency is specified.
- Adjust the settings to determine how often the report should be generated (e.g., daily, weekly, monthly).
- Ensure the frequency aligns with your reporting needs and campaign monitoring practices.
4. Test and schedule the script
- Run a preview to ensure correct report generation:
- Before running the script, click the “Preview” button to execute a test run.
- Review the preview results to ensure the report is generated correctly and contains the desired metrics.
- Schedule the script to run at desired intervals:
- If the preview results are satisfactory, click the “Save” button to save your script.
- To run the script immediately, click the “Run” button.
- To schedule the script to run automatically at regular intervals, click the “Schedule” button (usually found next to “Run”).
- Choose the frequency (e.g., daily, weekly, monthly) and specific times for the script to run, ensuring continuous and timely reporting.
Try these Google Ads scripts for optimized campaigns
Google Ads scripts offer a powerful way to automate and optimize your campaigns, leading to improved efficiency and performance. By implementing scripts like the Account Anomaly Detector, Ad Performance, Bid by Weather, Change History, and Account Summary, you can proactively manage your campaigns, save time, and focus on strategic decision-making.
Experiment with these scripts and explore the vast possibilities for automation and optimization to stay ahead in the competitive world of digital marketing.
For additional resources on Google Ads scripts, check out the Google Ads Scripts documentation and community forums where you can find more scripts and tips from other digital marketers. You can find a full list of Google Ads scripts for both single and manager accounts provided by Google.

Meet The Author
Alessandro Colarossi
Alessandro is an accomplished digital marketing professional with over a decade of experience in various tech fields. He currently works as a Customer Success Manager at Google and teaches Digital Marketing at Sheridan College in Ontario, Canada. He also co-authored the book Becoming Artificial and writes articles for Philosophy Now Magazine and various digital marketing websites. You can learn more about Alessandro at alessandrocolarossi.com.


Comments
Please read our Comment Policy before commenting.